
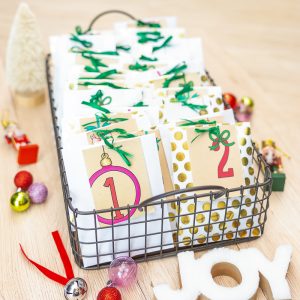


Today I’d like to share with you a really quick and easy advent calendar craft that my daughter and I made for a friend! (Quick and easy is definitely my sort of Christmas crafting!). This is such a fun project as it allows you to create the perfect, personalised Countdown to Christmas for you and your family and is a project that can be made by kids, with your kids or for your kids! All you need to make it are some basic craft supplies, some paper bags and your choice of advent treats.

Here’s what you need to whip up this simple advent calendar:
DIY Advent Calendar supplies:
- December Days printable number cards
- small paper bags or envelopes
- your choice of gift to fill the bags: small gifts, sweets / candy, printed notes with daily activities etc
- your choice of fastener: washi tape, staples, glue, ribbon etc
- Optional: a container to hold the completed calendar bags (basket, box, tray, dish etc)
- Optional: string, twine or garland and small pegs to attach the bags to your hanging advent calendar

How to make your own advent calendar:
Step 1: print the number cards onto a medium weight cardstock. Two versions of the cards are included in the download, one with a lovely kraft paper style background and one with a soft white background so you can pick which one to use, or mix and match both versions!

We decided to mix and match the cards, mainly using the kraft coloured ones on our white bags and the white background ones on our coloured bags for some contrast.

Step 2: cut out the cards. We used scissors, but you could use a cutting knife, trimmer or guillotine.


Step 3: fill your bags or envelopes with treats! Here’s where you can create a really personal calendar for the recipient. You could make a family Christmas activity calendar by adding a printed or handwritten note with a special activity to do together on each day. Or you could fill each bag with your favourite sweets or candy, little toys such as lego minifigures (always a hit in my house!), small stationery items such as stickers and washi tape, beauty supplies (my daughter would very much appreciate a new nail varnish a day!), movie or lottery tickets, a special ornament to hang on the tree etc – the options are endless! We used a mixture of sweet treats, small gifts and some printed notes with activities for all the family.

Step 4: seal the filled bags and attach the printed number cards. Use your choice of fastener (maybe washi tape, coloured staples, double-sided tape or glue) to secure the bag closed and attach the card to the front of the bag . We wanted to use ribbon and so we folded the top of the bag over, punched a couple of holes using an eyelet punch and then threaded a length of ribbon through and tied it into a bow. We really liked how the ribbon added some extra dimension to the ornament illustrations on the cards!


Step 5: arrange all your advent bags together to complete your calendar! We decided to place all the bags together in a wire basket we had to hand, but you could use any suitable container: maybe a decorative tray, a pretty serving dish or a cardboard box covered with Christmas wrapping paper. You could also hang each of the bags from a string, ribbon or garland using small pegs – perfect for hanging across a fireplace!


If you have very young children you could always just give them one bag a day rather than having them all out on display, you could even make it into a mini treasure hunt by hiding the bags and giving a clue to their location. Another fun idea would be to make a reading advent calendar by wrapping a selection of Christmas books and attaching the number cards to them – you could countdown to Christmas by unwrapping a new book every evening and enjoying festive bedtime stories!
I hope you have enjoyed this quick and easy craft and that it has encouraged you to make your own advent calendar! If you do, I’d love to see what you create so please feel free to tag me on Instagram or Facebook, or drop me an email with your advent adventures.
Happy crafting and Merry Christmas!
Other Christmas crafts you might like:


 Christmas in London handmade card tutorial
Leave a Reply