
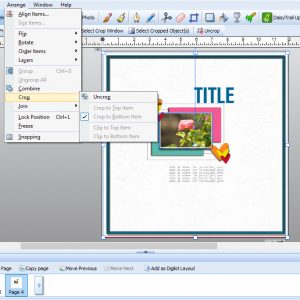

You can do this by using the “clip to” or “crop to” command. I have found that the photo placement is the most tricky one for me because you have to resize the photo first. (If you don’t you can not move the actual photo to make it fit later). Alternatively, if the template has a stroke around the photo placement on the template, you can drag that stroke into the frame tab, turn it into an actual frame and place the photo in that – that way you can manipulate the position as much as you like.

The Crop To command is found under the Arrange menu on the top tool bar (the one on your right does not include that option). It is important with either option that both items are selected, so looking at the layers menu to find the right one is important. Place the photo over the photo placement on the template and with both selected go to Arrange > Crop> Crop to bottom item. And your photo becomes cropped to the template PNG.

You can use this method to add all your papers and photos to the template shapes, or you can get creative and add a style or an effect to some of your layers. You can move the things on the template, but if you are using the template shadow layers make sure the shadow is moved too.

Here I am using the same method as with the photo, but since I am cropping the shape to a paper with an even pattern I do not have to resize anything, so I move the shape out onto the paper and select them both, then crop to bottom as before. I find it is easier to do it this way than on the template itself.

Next I select the borders, recolour one shadow to a lighter gray and start experimenting with different effects using the options next to the layers tab. I think the plastic effect will work.
I then select the background paper, and give it a hint of pink using the colour picker and colour palette.

I recolour the hearts by selecting them one by one, it is easy enough to do this from the layers palette if you can not select them by clicking directly on them (this sometimes happens because everything is on a transparent background and the layers block each other). When selected, chose a colour from the colour palette to recolour them to match your page.
I settle on white plastic effect for the border.

Last I remove the Journal here PNG by deleting it. I select the text tool and write a small piece of journaling in its place, picking a font I like. I do the same with the title.

My finished page:

As a last step, I decided I did not like the white plastic effect on the frame and changed it to marble effect instead. Using quick shapes I made some white hearts and gave them the same effect for consistency. I also added the effect to the other hearts. The little trowel is added in the same way we normally add embellishments.
Hope you enjoy the process! If you are daunted by placing all the PNGs, don’t worry – it takes longer to read this than to actually do it!
On the next page I will show you how to use the template as part sketch, part template.

 Fantabulous Fall
Leave a Reply