
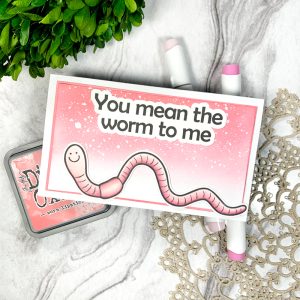

Spring is in the air! Well, sort of… But with the first day of spring this month (hard to believe!), let’s celebrate the start of a new season with a spring-themed card featuring the Springity Spring Digital Stamps!

Since I will be using the Worm Stamp, I decided to make a mini slimline card this time around, so after cutting and scoring my card to measure 3.5” x 6”, I planned out my card in Cricut Design Space. For this card, I decided to go with the sentiment, “You mean the worm to me.” It was just so cute that I had to go with it!

Now that I have my image and sentiment printed onto 100lb Hammermill cardstock and cut out using my Cricut cutting machine, it’s time to colour! I used the following Ohuhu alcohol markers to colour the worm: RV180, RV200, RV260, RV270

I also decided to add a bit more colour using the following Prismacolor Pencil Crayons: Clay Rose – PC 1017, Pink – PC 929, Blush Pink – PC 928, Deco Pink – PC 1014 and White – PC 938
This step is completely optional; however, I have been quite enjoying using and experimenting with pencil crayons, so I decided to use them.
To create the background, I trimmed down a piece of white cardstock to measure 3” x 5.5” to act as my card front. I also trimmed down a piece of cardstock slightly larger than this to act as a mat for the card.

I ink-blended both the card front and edges of the mat using Worn Lipstick Distress Oxide to match the colour of the worm. I also splattered the card front using white paint – one of my favourite things to do!

And now to assemble the card! Using liquid adhesive, I first glued the card front onto the mat, then the mat onto my mini slimline card base, and lastly, I glued the sentiment and worm image onto the card.

Ta-da! That’s the finished project!


Thank you all for reading! See you next time!
Sasha
Materials Used:
- Springity Spring Digital Stamps
- Hammermill 100lb Cardstock
- Basic white cardstock
- Ohuhu alcohol markers
- Worn Lipstick Distress Oxide
- White paint
- Liquid adhesive


 Free Digital Scrapbooking Template: Framed
Leave a Reply