
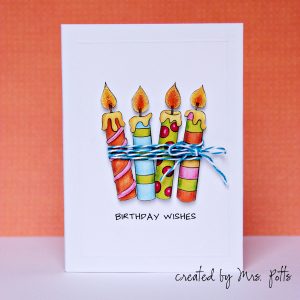

Hey everyone, Jewelle here again! Last month I promised to come back and show a few ways to take a card from basic to advanced. Please don’t get scared by the term “advanced”. These techniques are definitely not hard, but they do take a little more time. I can testify though that putting in that little bit of extra time is so worth it when you hand someone a card and their face lights up over it.
Last month we went over how to make this card:

Today we are going to use that exact same design for our advanced techniques card. I am doing this so you can see the difference in the two cards. To get started lets go over a few additional supplies you will need. These supplies should be available at your local craft or scrapbook store.
- Bone folder
- Baker’s twine
- Foam adhesive
- Stickles or Glitter glue
- Optional: Scoreboard (not pictured)

Now lets get started on the card!
First open the file containing the card you made last month. Also open an 8.5 x 11 blank file. Delete the black border you created to frame the card. Duplicate all your other layers from your original file to the new file. Separate the pieces of the card so they are not overlapping each other. The only exception to this would be to leave the wording on the card’s background paper. Make sure to delete or turn off any shadowing you have applied to the layers. You may also want to add a 1px black stroke to your card’s background paper so that you can see where to cut it. In the picture I have added one.

Print and cut out the pieces to your card. I cut all of these using scissors.

Apply a small amount of Stickles to your finger and swipe a thin coat on each of the flames. Be sure and get all of the flame for the best effect. The Stickles will make the candle flames look like they are lit and twinkling. Stickles is a great way to add a little bit of sparkle to any card.

While your candles are drying flip your background card over and score a border onto it using your bone folder. You can see in the picture the pencil marks letting me know where to begin and stop my border. This may be something you want to do before scoring. My border is 3/8 of an inch from the edge of the paper. You can also see that I used a scoring board. Although these are convenient they are not necessary. I used to use a ruler and a table knife to score all my projects! Scoring borders into your card adds a polished look to it and keeps they eye focused on the sentiment. Adhere your card background to your pre-folded card.

Before starting this next step make sure your candles are dry! Apply the foam adhesive squares to the back of the candles. These will pop the candles off the page creating some amazing dimension to the card! Notice that I left a gap in the middle of my foam squares. It is important to leave this space for your baker’s twine to go through.

Adhere your candles to your card background.

Now for the trickiest part! Snip off about a foot of baker’s twine. Slide your twine under your candles starting on the right. Holding the card sideways allows gravity to help you with this. Once through leave about three inches sticking out on the right. Take the twine and cross over your candles then thread it under them again. Repeat twice more. On the right tie off the baker’s twine by making a bow. Snip excess twine off of the bow ends. You could use something other than baker’s twine. I use ribbon often and it provides the same affect. Your finished!

Here is a comparison of the two so you can see the differences:

Can you see the difference? I sure can! I hope you give some of these techniques a try! Be sure and post your cards or other projects using Kate’s doodles in Kate’s gallery over at The Lilypad. We would love to see them!

 Spring Clean & Wash Day
I just discovered your blog and I love everything about what you do! I wish I could do it too! I am an artist but have yet to discover a way to make a living being one! I appreciate your talent. I love your products. I would love to work with them and have you as a mentor!
Thank you so much for your kind words Emily! 🙂
Gorgeous! I ♥♥♥ hybrid!
Very cool, Jewelle! Loved seeing your process!
Very cool Jewelle!!! I will definitely give that a go. I recently discovered the foam squares and it really is cool how you tied the string!!