
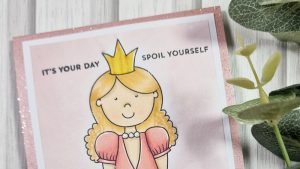


Hello crafters, I hope you’re all well. I’ve got another card tutorial for you. Strap in – I’ll talk you through it!

My first step was to print my Princess from ‘Happily Ever After‘ onto some White Super Smooth card. When using alcohol markers (which I’ll be doing) it is essential to use a good colouring card in order for the markers to blend. I trimmed this panel down to approx 1cm smaller round each edge than a UK A6 card blank.
I went ahead and coloured my princess using my Copic Markers.
Dress: R32, R43, R20
Hair: YR31, YR23, YR20
Skin: E51, E31
Tiara: E27, Y35, Y15, Y11
I added my usual white highlights using a gel pen.

I coloured the outside area of my image using some colour cloud to bring all the colours together. The white background was too stark alone.

Next, I mounted my image onto a panel of white card approx 3mm larger round each edge than my image using wet adhesive. Then, I mounted both these layers onto a sparkly pink UK A6 top fold card blank.

I wanted to make my card more tactile, so I added a little tulle layer to the dress! I added some clear foam tape across the waistband of the dress. I trimmed some tulle down and stuck it within the dimensions of the tape. Then, over the top of this, I attached a piece of pink ribbon.

Finally, I stamped a sentiment from my stash. This is the card complete!

I hope you like it and were able to follow on. Until next time, take care.
Lots of love, Dani xx
Materials Used:
- Happily Ever After digital stamps
- Alcohol markers
- Clear foam tape
- Wet adhesive
- White gel pen
- White card
- Pink card blank
- Tulle for the skirt


 All The Family collection part 3
Leave a Reply