

It’s the last Sunday in the month, and hybrid is taking over the blog again!
This month I want to show you a project that I’ve been planning to do for a while, and always chickened out of by convincing myself it would be too much effort or would end up looking totally blah!
Wondering what project had me surrendering before I started? Homemade cufflinks!

My husband has recently fallen in love with shirts that require cufflinks, and I’ve bought him some lovely designs over the past few months, but some of the simpler ones made me stop and think: I could sooo do this!!! The more I looked at the cufflinks, the more I realised that similar techniques are used to make some pendants too so I figured if I could master making one I could probably do both. Reasonable thinking, right?
It was very easy to find the cuff link blanks and corresponding cabochon cameo covers via Google. You do need to know the colour (silver or gold effect), shape (circle etc), and size of cufflink you want to make. I chose to make small ones (12mm), but next time I will definitely choose a larger size. I purchased my supplies (enough to make 5 pairs) from an Etsy store for less than £8.
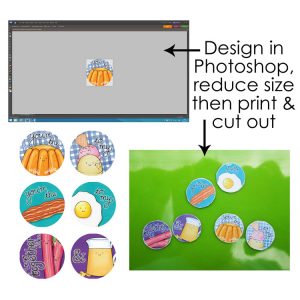
Next, I made small circular blank file on Photoshop, and played with designs for my cuff link set. I settled on Kate’s We Go Together Like & We Go Together Too, as I thought the 2-part nature of the doodles complemented the 2-part nature of cufflinks and the doodles were simply too cute to resist 😉
Once I was happy, I merged the layers for each design and reduced the image size to fit my blanks (12mm). After cutting and pasting them all onto one document for simplicity, I printed them and then used my scissors to carefully cut out the lot. This was a little tricky due to the tiny size of the circular designs, but the key was just to take it slowly.

Now for assembly. As glue was involved, I collected what I needed so that I wouldn’t have to stop midway through: my already cut-out designs, the cufflink blanks and cabochon covers, plus my adhesive and a pair of tweezers just in case.
I used Diamond Glaze as my glue, as I already had it in my stash and it dries beautifully clear and very firmly! I added a very small amount of glue to the inside of the cufflink and adhered my first design. Next I added a slightly larger blob of glue on top of the design and popped the cabochon cover on. I then held it for a few moments to allow the glue to dry, before moving onto the next one.
Honestly, it was that easy! Glue, stick, glue, stick and allow to dry.

Yes it was a little fiddly, mainly because I went for small cufflinks and glue was involved, but otherwise it was a pretty simple process, and I’m left wondering why I put off making them for so long!
My husband is delighted with them, my son thinks I’m a genius and I’m just amazed at how good they look!

If you know anyone who wears or likes cufflinks I would positively recommend you have a go as they make straightforward and super attractive homemade gifts – think wedding favours, anniversaries and Christmas too!
As this was such a stress-free and successful project, I’ve now ordered my pendant blanks! I’ll let you know how they go 🙂
See you in September!
Sara

 Free Digital Scrapbooking template: Scrap Like Christa
Good day,
Thank you for this post. It was just what I needed. However I have a few questions;
1. When cufflink blanks and cabochon are sold separately, how do I know what size of cabochon to buy for example; what size of cabochon to buy for a 14mm cufflinks blanks or are they to be the same size?
2. Does the cabochon require some sort of adhesive to stay stuck to the cufflinks blanks or once the cut-out is glued to the blanks all that’s left is to place the cabochon on the glued cutout and it stays stuck?
Thank you so much once again, anticipating your swift response
Love these – what a great idea.
fabulous project!! tfs